F5 Solutions for Containers > Class 3- Application Deployments with BIG-IP and Application Services (AS3) Source |
Lab 2 - Creating an HTTPS application with SSL Offload or SSL Bridging
In this portion of the lab, you will be creating more applications via AS3. The focus in these labs is creating applications that require SSL.
HTTPS application with SSL Offload
In this section we will start by building out a basic HTTPS application with SSL Offload.
In Postman expand the section for
Lab 2.Open the
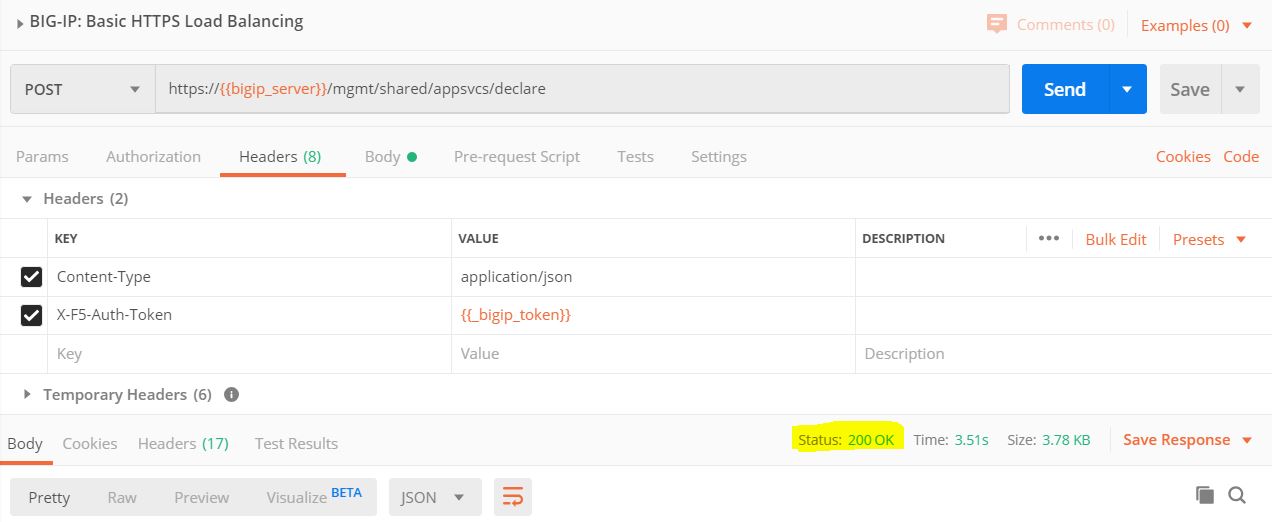
BIG-IP: Authenticatedeclaration, and clickSendto refresh the token used for authentication.Open the
BIG-IP: Basic HTTPS Load Balancingoption and click on theBodysection of the POST Request. The body will look like the following:1 2 3 4 5 6 7 8 9 10 11 12 13 14 15 16 17 18 19 20 21 22 23 24 25 26 27 28 29 30 31 32 33 34 35 36 37 38 39 40 41 42 43 44 45 46 47 48 49 50 51 52 53 54 55 56 57 58 59
        {
  "class": "AS3",
  "action": "deploy",
  "persist": true,
  "syncToGroup": "/Common/failoverGroup",
  "declaration": {
    "class": "ADC",
    "schemaVersion": "3.0.0",
    "id": "123abc",
    "label": "Sample 2",
    "remark": "HTTPS with predictive-node pool",
    "Sample_02": {
      "class": "Tenant",
      "A1": {
        "class": "Application",
        "template": "https",
        "serviceMain": {
          "class": "Service_HTTPS",
          "virtualAddresses": [
            "10.1.20.101"
          ],
          "pool": "web_pool",
          "serverTLS": "webtls"
        },
        "web_pool": {
          "class": "Pool",
          "loadBalancingMode": "round-robin",
          "monitors": [
           "http"
          ],
          "members": [{
            "servicePort": 80,
            "shareNodes": true,
            "serverAddresses": [
              "10.1.10.33",
              "10.1.10.34"
            ]
          }]
        },
        "webtls": {
          "class": "TLS_Server",
          "certificates": [{
            "certificate": "webcert"
          }]
        },
        "webcert": {
          "class": "Certificate",
          "remark": "in practice we recommend using a passphrase",
"certificate": "-----BEGIN CERTIFICATE-----\nMIICnDCCAgWgAwIBAgIJAJ5n2b0OCEjwMA0GCSqGSIb3DQEBCwUAMGcxCzAJBgNVBAYTAlVTMRMwEQYDVQQIDApXYXNoaW5ndG9uMRAwDgYDVQQHDAdTZWF0dGxlMRQwEgYDVQQKDAtmNV9OZXR3b3JrczEbMBkGA1UEAwwSc2FtcGxlLmV4YW1wbGUubmV0MB4XDTE3MTEyNjE5NTAyNFoXDTE4MDIyNTE5NTAyNFowZzELMAkGA1UEBhMCVVMxEzARBgNVBAgMCldhc2hpbmd0b24xEDAOBgNVBAcMB1NlYXR0bGUxFDASBgNVBAoMC2Y1X05ldHdvcmtzMRswGQYDVQQDDBJzYW1wbGUuZXhhbXBsZS5uZXQwgZ8wDQYJKoZIhvcNAQEBBQADgY0AMIGJAoGBALEsuXmSXVQpYjrZPW+WiTBjn491mwZYT7Q92V1HlSBtM6WdWlK1aZN5sovfKtOX7Yrm8xa+e4o/zJ2QYLyyv5O+t2EGN/4qUEjEAPY9mwJdfzRQy6Hyzm84J0QkTuUJ/EjNuPji3D0QJRALUTzu1UqqDCEtiN9OGyXEkh7uvb7BAgMBAAGjUDBOMB0GA1UdDgQWBBSVHPNrGWrjWyZvckQxFYWO59FRFjAfBgNVHSMEGDAWgBSVHPNrGWrjWyZvckQxFYWO59FRFjAMBgNVHRMEBTADAQH/MA0GCSqGSIb3DQEBCwUAA4GBAJeJ9SEckEwPhkXOm+IuqfbUS/RcziifBCTmVyE+Fa/j9pKSYTgiEBNdbJeBEa+gPMlQtbV7Y2dy8TKx/8axVBHiXC5geDML7caxOrAyHYBpnx690xJTh5OIORBBM/a/NvaR+P3CoVebr/NPRh9oRNxnntnqvqD7SW0U3ZPe3tJc\n-----END CERTIFICATE-----",
"privateKey": "-----BEGIN RSA PRIVATE KEY-----\nProc-Type: 4,ENCRYPTED\nDEK-Info: AES-256-CBC,D8FFCE6B255601587CB54EC29B737D31\n\nkv4Fc3Jn0Ujkj0yRjt+gQQfBLSNF2aRLUENXnlr7Xpzqu0Ahr3jS1bAAnd8IWnsR\nyILqVmKsYF2DoHh0tWiEAQ7/y/fe5DTFhK7N4Wml6kp2yVMkP6KC4ssyYPw27kjK\nDBwBZ5O8Ioej08A5sgsLCmglbmtSPHJUn14pQnMTmLOpEtOsu6S+2ibPgSNpdg0b\nCAJNG/KHe+Vkx59qNDyDeKb7FZOlsX30+y67zUq9GQqJEDuysPJ2BUNP0IJXAjst\nFIt1qNoZew+5KDYs7u/lPxcMGTirUhgI84Jy4WcDvSOsP/tKlxj04TbIE3epmSKy\n+TihHkwY7ngIGtcm3Sfqk5jz2RXoj1/Ac3SW8kVTYaOUogBhn7zAq4Wju6Et4hQG\nRGapsJp1aCeZ/a4RCDTxspcKoMaRa97/URQb0hBRGx3DGUhzpmX9zl7JI2Xa5D3R\nmdBXtjLKYJTdIMdd27prBEKhMUpae2rz5Mw4J907wZeBq/wu+zp8LAnecfTe2nGY\nE32x1U7gSEdYOGqnwxsOexb1jKgCa67Nw9TmcMPV8zmH7R9qdvgxAbAtwBl1F9OS\nfcGaC7epf1AjJLtaX7krWmzgASHl28Ynh9lmGMdv+5QYMZvKG0LOg/n3m8uJ6sKy\nIzzvaJswwn0j5P5+czyoV5CvvdCfKnNb+3jUEN8I0PPwjBGKr4B1ojwhogTM248V\nHR69D6TxFVMfGpyJhCPkbGEGbpEpcffpgKuC/mEtMqyDQXJNaV5HO6HgAJ9F1P6v\n5ehHHTMRvzCCFiwndHdlMXUjqSNjww6me6dr6LiAPbejdzhL2vWx1YqebOcwQx3G\n-----END RSA PRIVATE KEY-----",
          "passphrase": {
            "ciphertext": "ZjVmNQ==",
            "protected": "eyJhbGciOiJkaXIiLCJlbmMiOiJub25lIn0"
          }
        }
      }
    }
  }
}
Click on
Send.Confirm the results of the POST, and make sure you receive a result of 200.
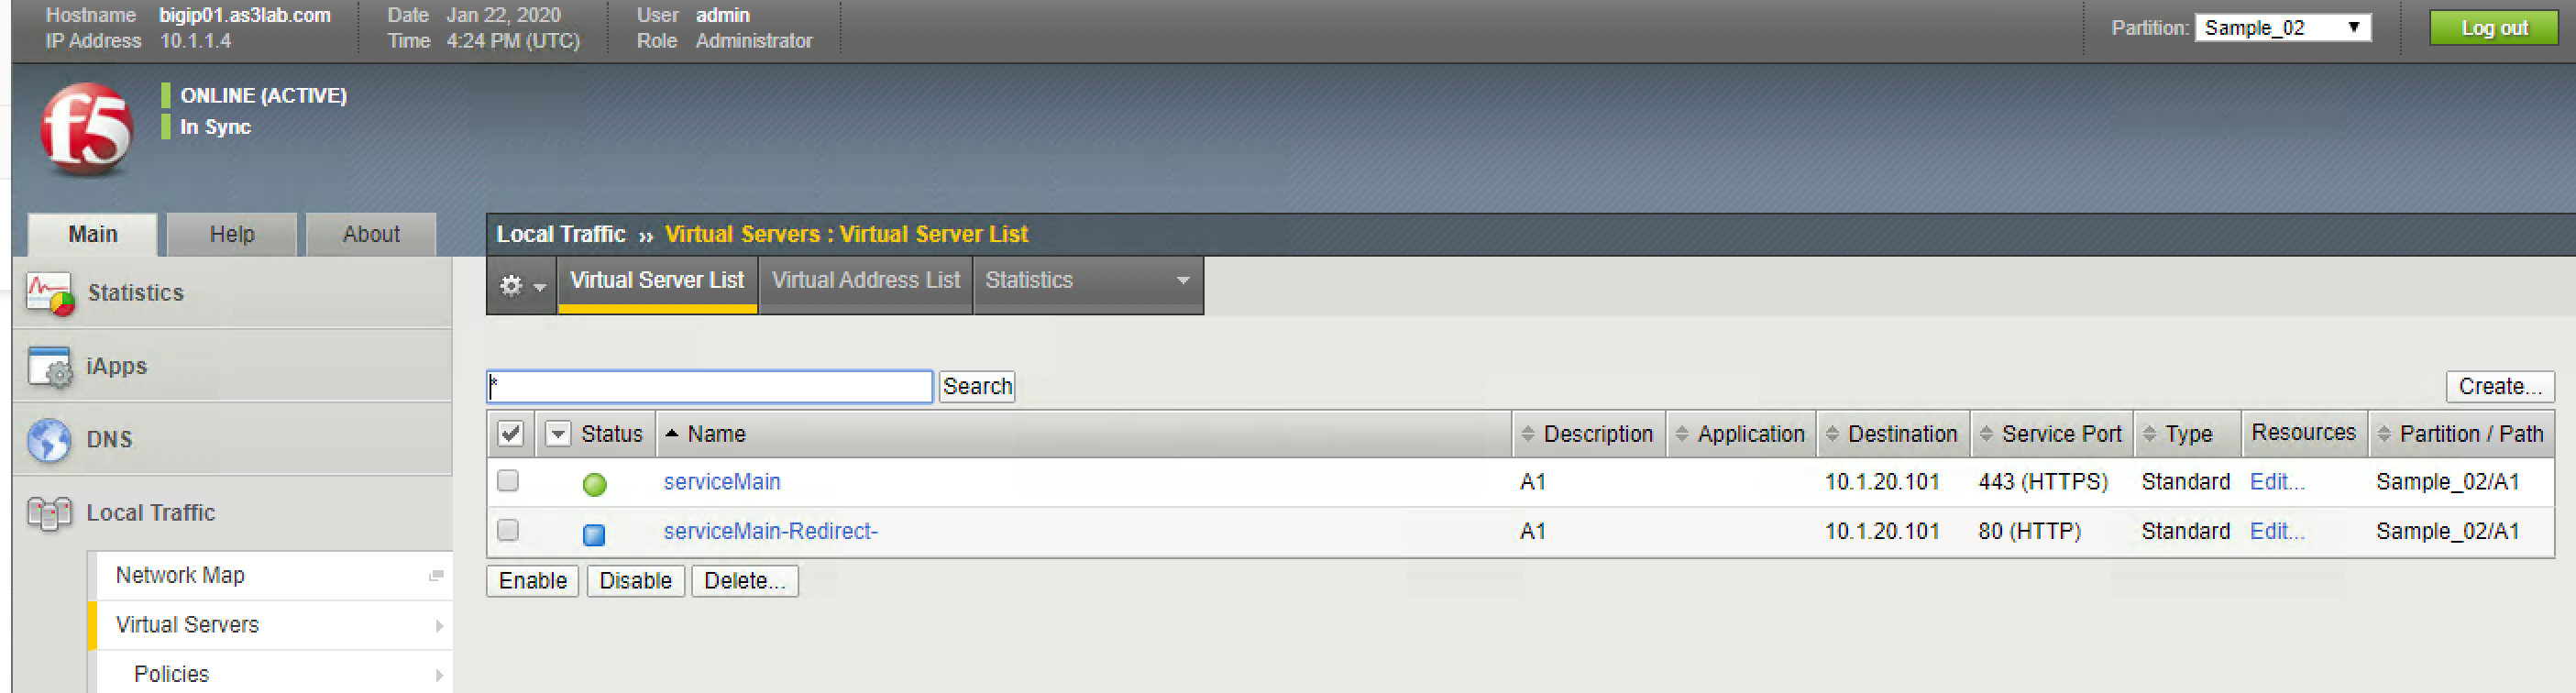
- Login to the BIG-IP to confirm our changes. Open Chrome and navigate to https://10.1.1.4 (or you can click on the
BIG-IP01bookmark in Chrome). - Login with the following credentials: username = admin , password = admin.
- Expand Local Traffic and then Virtual Servers. In the Partition expand
Sample_02. You should see the following:
- In a new tab open
http://10.1.20.101. This will automatically redirect to SSL and throw a certificate error since our cert doesn't match the hostname used. - Click through ignoring the certificate error and the application is working.
HTTPS Application with SSL Bridging
In many environments it is required to perform TLS (SSL) from beginning to end of the communication path. In this example we will perform SSL Bridging by adding a serverSSL profile in addition to the ``clientSSL` profile in the previous exercise.
In Postman select the Lab2,
BIG-IP: HTTPS with Serverssl profile. Notice in the body that we have added aclientTLSoption. Why is a serverssl profile applied as a clientTLS option?The body of the post will be as follows:
}
}
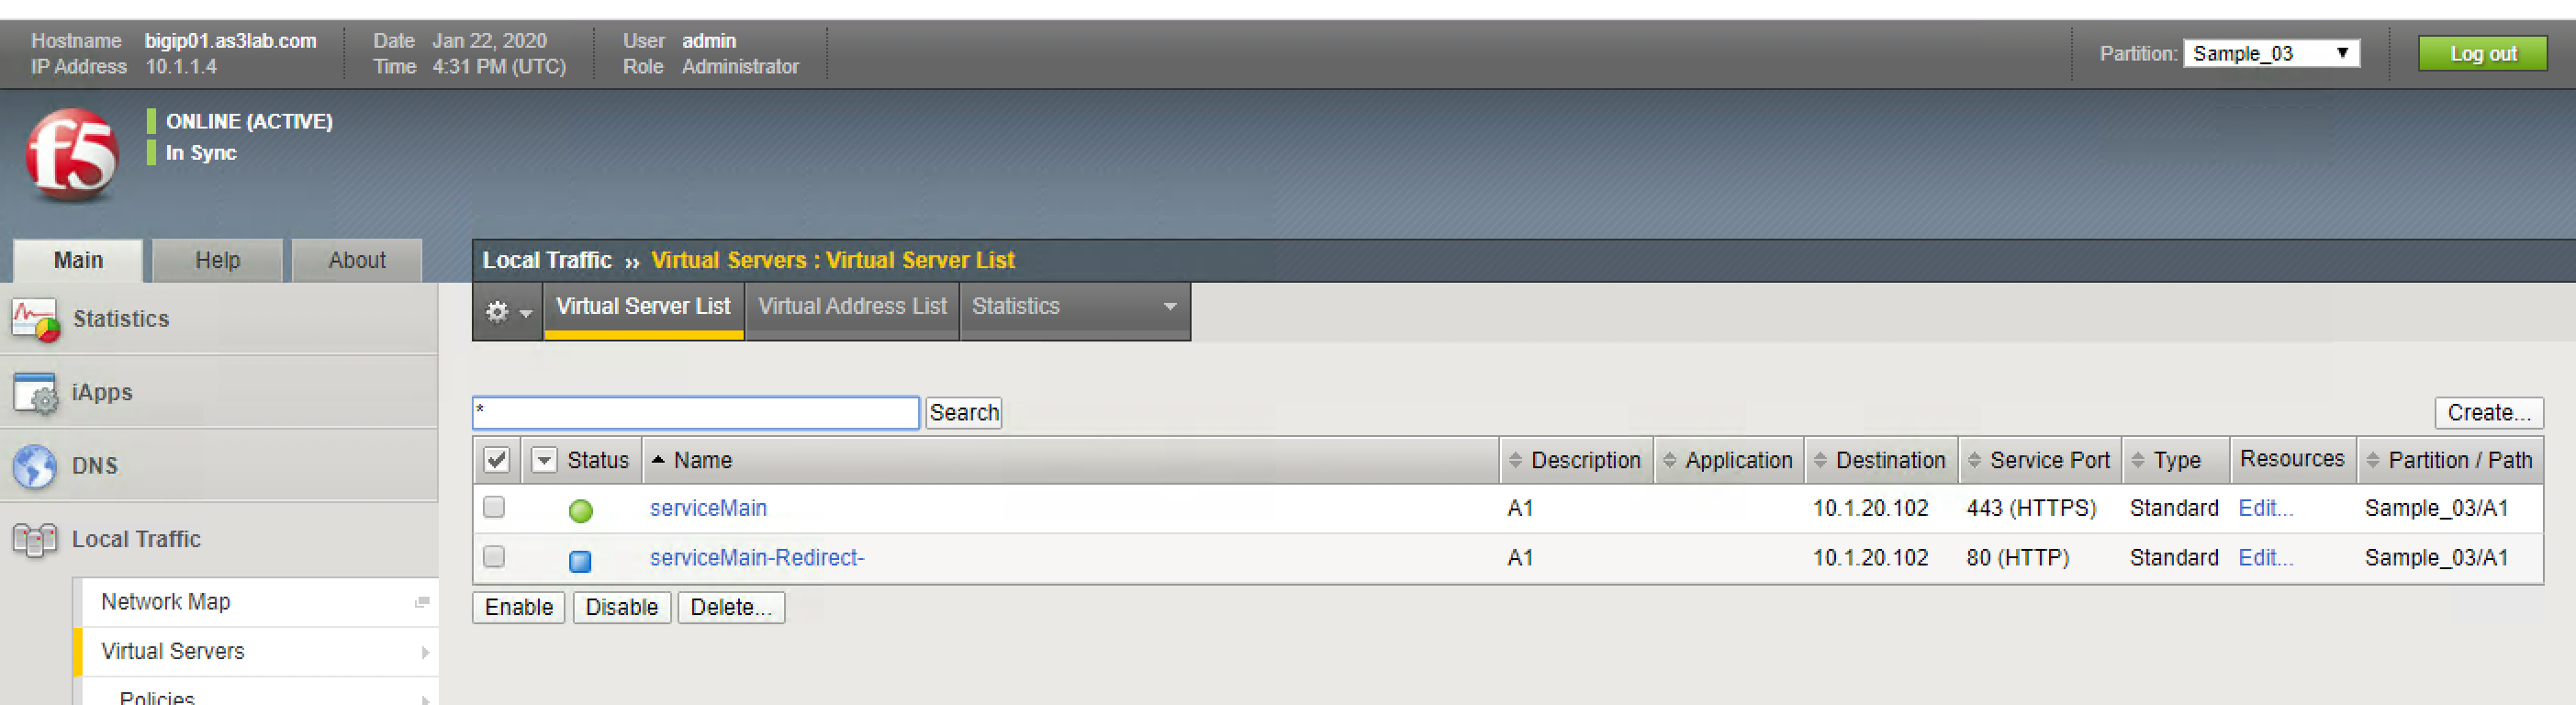
- Click on
Send. - Confirm results of the POST, and make sure you receive a result of 200.
- Verify that the configuration is on the BIG-IP. Select the partition Sample_03 and notice the new virtual servers:
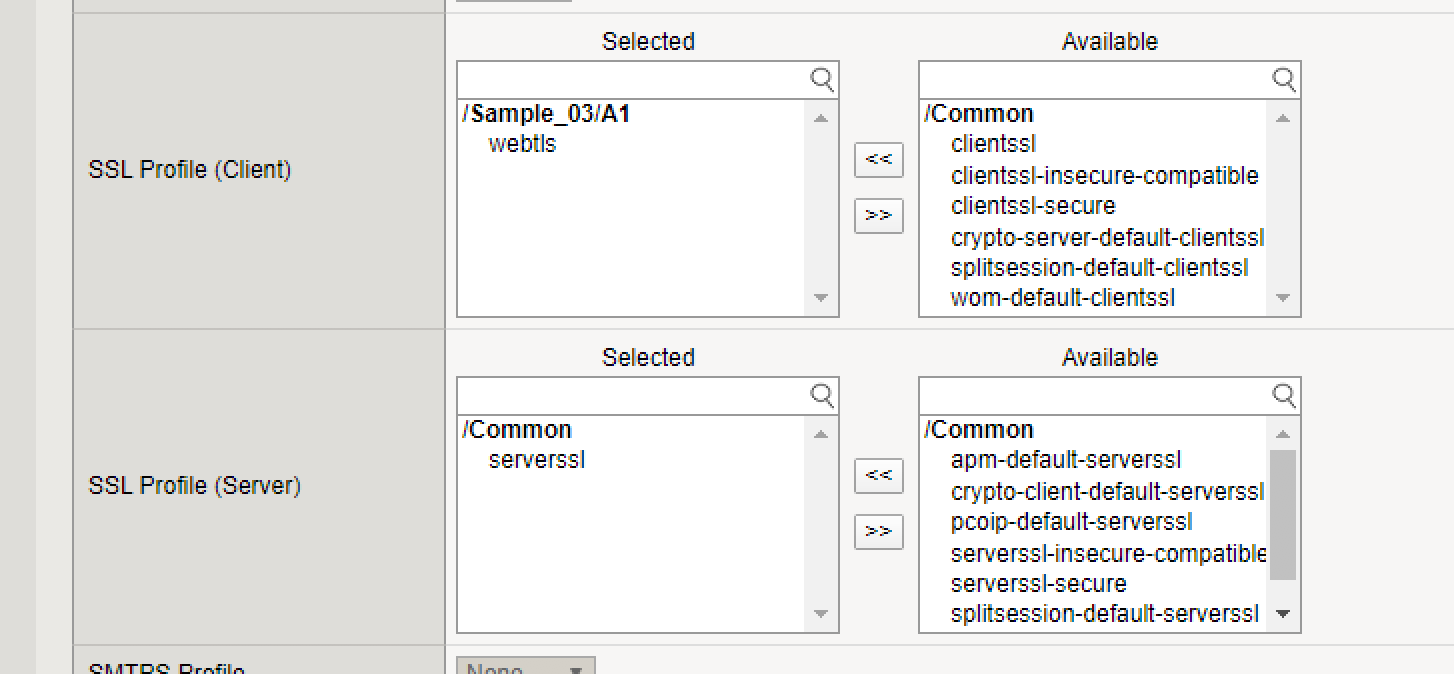
- Click on the
serviceMainvirtual server and notice in the SSL section that we have both a ClientSSL profile and a ServerSSL profile applied:
In your browser now go to
http://10.1.20.102.Do you notice in your declaration what the persistence settings are? If you refresh do you end up rotating through the two web servers or do you stay on one?
You are actually experiencing part of what the AS3 Service_HTTPS template does by default. The Service_HTTPS class has some default values that you can modify, but if you do not modify them they will automatically set. Cookie Persistence is the default persistence value for the Service_HTTPS class.
You can see the default values here: https://clouddocs.f5.com/products/extensions/f5-appsvcs-extension/latest/userguide/examples.html#example-2-https-application